Thymeleaf是一种用于Web和独立环境的现代服务器端的Java模板引擎,主要目标是将优雅的自然模板带到开发工作流程中,并将HTML在浏览器中正确显示,并且可以作为静态原型,让开发团队能更容易地协作。
第 1 章 简介
封捷:第八章 Thymeleaf | 代码重工
雷丰阳:05、Web 开发
第 2 章 基本语法
html 页面 th:href 标签,以/开头不影响请求处理
2.1 基本语法
2.1.1 表达式
| 表达式名字 |
语法 |
用途 |
| 变量取值 |
${…} |
获取请求域、session 域、对象等值 |
| 选择变量 |
*{…} |
获取上下文对象值 |
| 消息 |
#{…} |
获取国际化等值 |
| 链接 |
@{…} |
生成链接 |
| 片段表达式 |
~{…} |
jsp:include 作用,引入公共页面片段 |
第 3 章 使用
3.1 springmvc 环境使用
使用步骤
- 添加 thymeleaf 的 jar 包
- 新建一个 Servlet 类
ViewBaseServlet.java
1
2
3
4
5
6
7
8
9
10
11
12
13
14
15
16
17
18
19
20
21
22
23
24
25
26
27
28
29
30
31
32
33
34
35
36
37
38
39
40
41
42
43
44
45
46
47
48
49
50
51
52
53
54
55
| public class ViewBaseServlet extends HttpServlet {
private TemplateEngine templateEngine;
@Override
public void init() throws ServletException {
ServletContext servletContext = this.getServletContext();
ServletContextTemplateResolver templateResolver = new ServletContextTemplateResolver(servletContext);
templateResolver.setTemplateMode(TemplateMode.HTML);
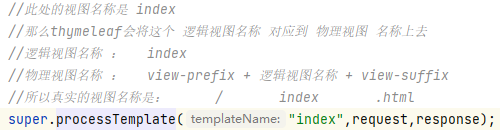
String viewPrefix = servletContext.getInitParameter("view-prefix");
templateResolver.setPrefix(viewPrefix);
String viewSuffix = servletContext.getInitParameter("view-suffix");
templateResolver.setSuffix(viewSuffix);
templateResolver.setCacheTTLMs(60000L);
templateResolver.setCacheable(true);
templateResolver.setCharacterEncoding("utf-8");
templateEngine = new TemplateEngine();
templateEngine.setTemplateResolver(templateResolver);
}
protected void processTemplate(String templateName, HttpServletRequest req, HttpServletResponse resp) throws IOException {
resp.setContentType("text/html;charset=UTF-8");
WebContext webContext = new WebContext(req, resp, getServletContext());
templateEngine.process(templateName, webContext, resp.getWriter());
}
}
|
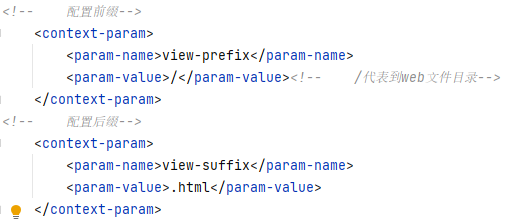
- 在 web.xml 文件中添加配置【init 方法中会使用到】
- 业务 Servlet 继承 ViewBaseServlet
- 调用父类(ViewBaseServlet)的
processTemplate方法
- html 页面使用 thymeleaf 的标签
- 修改 html 文件的表头:
<html xmlns:th="http://www.thymeleaf.org">
<th:if><th:unless><th:each><th:text>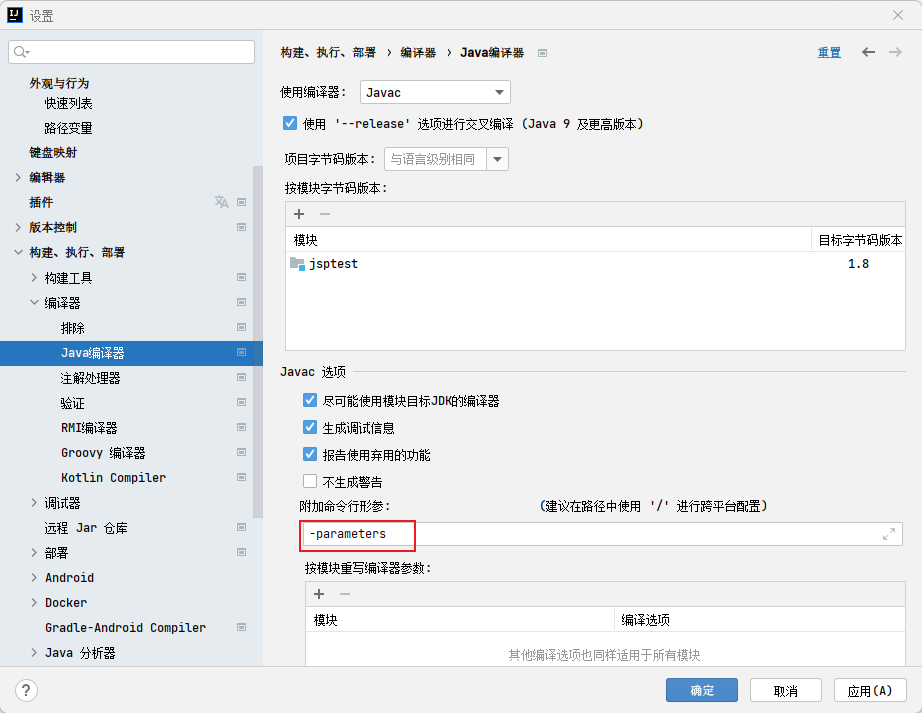
- 如果要利用 Java8 中,反射获取方法真实的形参名称的话,需要开启上述设置。
3.2 springboot 整合
引入 Starter
1
2
3
4
| <dependency>
<groupId>org.springframework.boot</groupId>
<artifactId>spring-boot-starter-thymeleaf</artifactId>
</dependency>
|
2、自动配置好了 thymeleaf
1
2
3
4
5
| @Configuration(proxyBeanMethods = false)
@EnableConfigurationProperties(ThymeleafProperties.class)
@ConditionalOnClass({ TemplateMode.class, SpringTemplateEngine.class })
@AutoConfigureAfter({ WebMvcAutoConfiguration.class, WebFluxAutoConfiguration.class })
public class ThymeleafAutoConfiguration { }
|
自动配好的策略
- 1、所有 thymeleaf 的配置值都在 ThymeleafProperties
- 2、配置好了 **SpringTemplateEngine **
- **3、配好了 ThymeleafViewResolver **
- 4、我们只需要直接开发页面
1
2
3
4
5
6
7
8
9
10
11
|
@RequiresRoles("admin")
@GetMapping("userLoginRoles")
@ResponseBody
public String userLoginRoles() {
System.out.println("登录认证验证角色");
return "验证角色成功";
}
|
第 4 章 使用案例
4.1 遍历元素
1
2
3
4
5
6
7
| <ul>
<li th:each="category : ${categories}">
<a href="#" class="header_main_left_a" th:attr="ctg-data=${category.catId}"
><b th:text="${category.name}">家用电器</b></a
>
</li>
</ul>
|
th:attr="ctg-data=${category.catId}"给自定义属性赋值。
原文链接: https://sk370.github.io/2022/09/06/thymeleaf/Thymeleaf/
版权声明: 转载请注明出处。