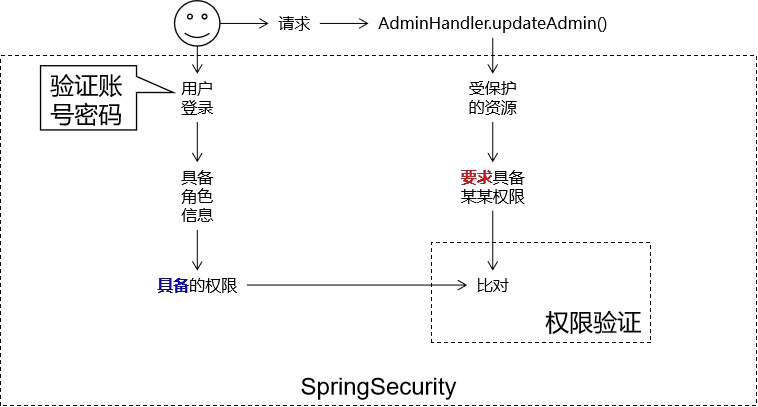
在web应用开发中,安全无疑是十分重要的,选择Spring Security来保护web应用是一个非常好的选择。Spring Security 是spring项目之中的一个安全模块,可以非常方便与spring项目无缝集成。
主要用于权限认证。
主体:principal
使用系统的用户或设备或从其他系统远程登录的用户等等。
简单说就是谁使用系统谁就是主体。
认证:authentication
权限管理系统确认一个主体的身份, 允许主体进入系统。 简单说就是“主体” 证明自己是谁。
笼统的认为就是以前所做的登录操作。
授权:authorization
将操作系统的“权力”“授予”“主体”, 这样主体就具备了操作系统中特定功能的能力。
授权就是给用户分配权限。
Spring 技术栈的组成部分。
和 Spring 无缝整合。
全面的权限控制。
专门为 Web 开发而设计。
旧版本不能脱离 Web 环境使用。
新版本对整个框架进行了分层抽取, 分成了核心模块和 Web 模块。 单独
重量级
Apache 旗下的轻量级权限控制框架。
轻量级。 Shiro 主张的理念是把复杂的事情变简单。 针对对性能有更高要求的
通用性。
好处: 不局限于 Web 环境, 可以脱离 Web 环境使用。
缺陷: 在 Web 环境下一些特定的需求需要手动编写代码定制。
创建工程 springmvc 的 web 工程
1 2 3 4 5 6 7 8 9 10 11 12 13 14 15 16 17 18 19 20 21 <dependencies > <dependency > <groupId > org.springframework</groupId > <artifactId > spring-webmvc</artifactId > <version > 4.3.20.RELEASE</version > </dependency > <dependency > <groupId > javax.servlet</groupId > <artifactId > servlet-api</artifactId > <version > 2.5</version > <scope > provided</scope > </dependency > <dependency > <groupId > javax.servlet.jsp</groupId > <artifactId > jsp-api</artifactId > <version > 2.1.3-b06</version > <scope > provided</scope > </dependency > </dependencies >
web.xml 中配置 DispatcherServlet
1 2 3 4 5 6 7 8 9 10 11 12 13 14 15 <servlet > <servlet-name > springDispatcherServlet</servlet-name > <servlet-class > org.springframework.web.servlet.DispatcherServlet</servlet-class > <init-param > <param-name > contextConfigLocation</param-name > <param-value > classpath:spring-mvc.xml</param-value > </init-param > <load-on-startup > 1</load-on-startup > </servlet > <servlet-mapping > <servlet-name > springDispatcherServlet</servlet-name > <url-pattern > /</url-pattern > </servlet-mapping >
加载 springmvc 配置文件,创建 DispatcherServlet
springmvc.xml 文件中配置 springsceurity 的扫描包、开启注解驱动、开启 servlet 默认前端控制器
1
2
3
4
5
6
7
8
9
10
11
12
13
14
15
16
17
<?xml version="1.0" encoding="UTF-8" ?> <beans xmlns ="http://www.springframework.org/schema/beans" xmlns:xsi ="http://www.w3.org/2001/XMLSchema-instance" xmlns:context ="http://www.springframework.org/schema/context" xmlns:mvc ="http://www.springframework.org/schema/mvc" xsi:schemaLocation ="http://www.springframework.org/schema/mvc http://www.springframework.org/schema/mvc/spring-mvc-4.3.xsd http://www.springframework.org/schema/beans http://www.springframework.org/schema/beans/spring-beans.xsd http://www.springframework.org/schema/context http://www.springframework.org/schema/context/spring-context-4.3.xsd" > <context:component-scan base-package ="iceriver.springsecurity" /> <bean class ="org.springframework.web.servlet.view.InternalResourceViewResolver" > <property name ="prefix" value ="/WEB-INF/views/" /> <property name ="suffix" value =".jsp" /> </bean > <mvc:annotation-driven /> <mvc:default-servlet-handler /> </beans >
此时还未引入 springsecurity,创建了一个解析/WEB-INF/views/*.jsp文件的普通项目
添加依赖:
1 2 3 4 5 6 7 8 9 10 11 12 13 14 15 16 17 18 <dependency > <groupId > org.springframework.security</groupId > <artifactId > spring-security-web</artifactId > <version > 4.2.10.RELEASE</version > </dependency > <dependency > <groupId > org.springframework.security</groupId > <artifactId > spring-security-config</artifactId > <version > 4.2.10.RELEASE</version > </dependency > <dependency > <groupId > org.springframework.security</groupId > <artifactId > spring-security-taglibs</artifactId > <version > 4.2.10.RELEASE</version > </dependency >
web.xml 文件中配置过滤器
1 2 3 4 5 6 7 8 <filter > <filter-name > springSecurityFilterChain</filter-name > <filter-class > org.springframework.web.filter.DelegatingFilterProxy</filter-class > </filter > <filter-mapping > <filter-name > springSecurityFilterChain</filter-name > <url-pattern > /*</url-pattern > </filter-mapping >
SpringSecurity 使用的是过滤器 Filter 而不是拦截器 Interceptor,意味着SpringSecurity能够管理的不仅仅是 SpringMVC 中的 handler 请求,还包含 Web 应用中所有请求。 比如:项目中的静态资源也会被拦截, 从而进行权限控制。
特别注意:springSecurityFilterChain 标 签 中 必 须 是 springSecurityFilterChain。 因为 springSecurityFilterChain 在 IOC 容器中对应真正执行权限控制的二十几个 Filter, 只有叫这个名字才能够加载到这些 Filter。
创建配置类,使用@EnableWebSecurity 注解开启 springsecurity 安全控制功能
1
2
3
4
5
6
7
8
9
10
11
12
13
14
15
16
17
package iceriver.springsecurity.config;import org.springframework.context.annotation.Configuration;import org.springframework.security.config.annotation.web.configuration.EnableWebSecurity;import org.springframework.security.config.annotation.web.configuration.WebSecurityConfigurerAdapter;@Configuration @EnableWebSecurity public class WebSecurityConfig extends WebSecurityConfigurerAdapter {}
此时所有请求都被拦截,要求登录才能访问,登录失败有错误提示
在 WebSecurityConfig 中重写父类的 configure(HttpSecurity security)方法。
1
2
3
4
5
6
7
8
9
10
11
12
13
@Configuration @EnableWebSecurity public class WebSecurityConfig extends WebSecurityConfigurerAdapter { @Override protected void configure (HttpSecurity security) throws Exception { security.authorizeRequests() .antMatchers("/index.jsp" ) .permitAll() .antMatchers("/layui/**" ) .permitAll() } }
效果:访问/layui 路径下的 index.jsp 会放行,访问/layui 路径下的其他资源会报 403 错误
目标:解决访问/layui 路径下的其他资源报 403 错误,实现跳转到登录页。
继续重写父类的 configure(HttpSecurity security)方法。
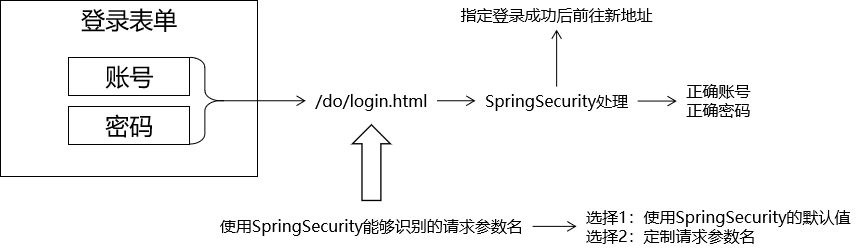
1
2
3
4
5
6
7
8
9
10
11
12
13
14
15
16
17
18
19
20
21
22
23
24
@Configuration @EnableWebSecurity public class WebSecurityConfig extends WebSecurityConfigurerAdapter { @Override protected void configure (HttpSecurity security) throws Exception { security.authorizeRequests() .antMatchers("/index.jsp" ) .permitAll() .antMatchers("/layui/**" ) .permitAll() .and() .authorizeRequests() .anyRequest() .authenticated() .and() .formLogin() .loginPage("/index.jsp" ) .loginProcessingUrl("/do/login.html" ); } }
loginPage()方法的说明 1:没有指定我们自己的地址时,拦截了会跳转到 springsecurity 的登录页
loginPage()方法的说明 2:
index.jsp GET 请求——去登录页面
index.jsp POST 请求——提交登录表单
index.jsp?error GET 请求——登录失败
index.jsp?logout GET 请求退出登录
登录策略:
设置登录页 index.jsp 的 form 表单地址、inputname 属性
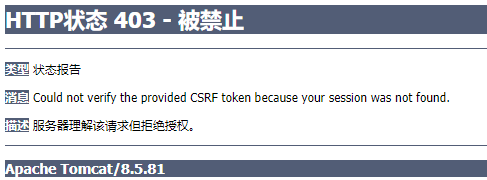
1 2 3 4 5 6 <p > ${SPRING_SECURITY_LAST_EXCEPTION.message}</p > <form action ="${pageContext.request.contextPath }/do/login.html" method ="post" > <input type ="hidden" name ="${_csrf.parameterName}" value ="${_csrf.token}" /> <input name ="loginAcct" /> <input name ="userPswd" /> </form >
form 表单中第一个 input 隐藏域设置的是跨域,未写该句提交表单不论账号密码正不正确,都会报 403 错误。(如果 spring security 设置了 crsf().disable()就不需要这句了)
SpringSecurity 默认账号的请求参数名: username
SpringSecurity 默认密码的请求参数名: password
要么修改页面上的表单项的 name 属性值, 要么修改配置。
修改配置可以调用 usernameParameter()和 passwordParameter()方法。
1
2
3
4
5
6
7
8
9
10
11
12
13
14
public class WebSecurityConfig extends WebSecurityConfigurerAdapter { @Override protected void configure (HttpSecurity security) throws Exception { security.authorizeRequests() …… .rocessingUrl()方法指定了登录地址,就会覆盖loginPage()方法中设置的默认值/index.jsp .loginProcessingUrl("/do/login.html" ) .usernameParameter("loginAcct" ) .passwordParameter("userPswd" ) .defaultSuccessUrl("/main.jsp" ); } }
这里 defaultSuccessUrl 地址写”main.html“是为了将请求发给 controlle 处理
重写另外一个父类的方法 configure(AuthenticationManagerBuilder builder), 来设置登录系统的账号密码 (内存中校验)
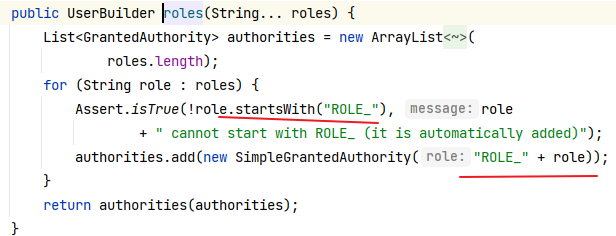
1
2
3
4
5
6
7
8
9
10
@Override protected void configure (AuthenticationManagerBuilder builder) throws Exception { builder.inMemoryAuthentication() .withUser("tom" ).password("123123" ) .roles("ADMIN" ) .and() .withUser("jerry" ).password("456456" ) .authorities("SAVE" ,"EDIT" ); }
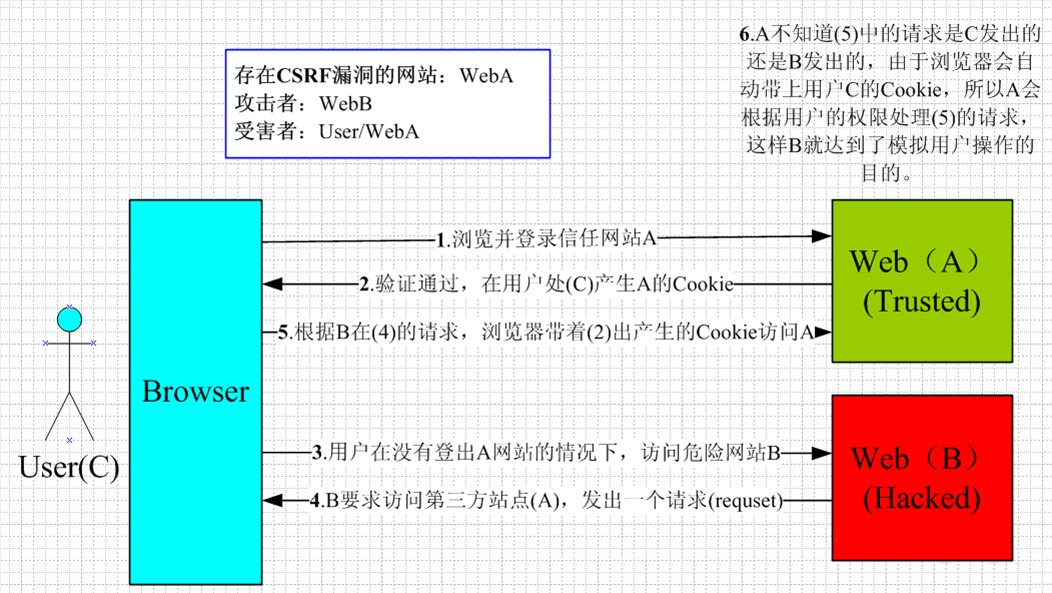
Cross-site request forgery 跨站请求伪造:发送登录请求时要携带_csrf 值
实现方式:调用 HttpSecurity 对象的一系列方法设置注销功能。
logout()方法: 开启注销功能
logoutUrl()方法: 自定义注销功能的 URL 地址
logoutSuccessUrl()方法: 退出成功后前往的 URL 地址
addLogoutHandler()方法: 添加退出处理器
logoutSuccessHandler()方法: 退出成功处理器
禁用 CSRF 功能
1
2
3
4
5
6
7
8
9
10
11
12
13
14
15
16
public class WebSecurityConfig extends WebSecurityConfigurerAdapter { @Override protected void configure (HttpSecurity security) throws Exception { security.authorizeRequests() …… .defaultSuccessUrl("/main.jsp" ); .and() .csrf() .disable() .logout() .logoutUrl("/do/logout.html" ) .logoutSuccessUrl("/index.jsp" ); } }
修改退出前端页面
1 2 3 <a id ="logoutAnchor" href ="${pageContext.request.contextPath }/do/logout.html" > 退出</a>
由于禁用了 crsf,此时登录页的 csrf 隐藏域会失效。不会报 403 错误
如果 CSRF 功能没有禁用, 那么要求页面上的请求必须是 POST 方式。
将退出的 a 标签换为 form 表单
1 2 3 4 5 6 7 8 9 10 11 12 13 14 15 16 17 <form id ="logoutForm" action ="${pageContext.request.contextPath }/my/logout" method ="post" > <input type ="hidden" name ="${_csrf.parameterName}" value ="${_csrf.token}" /> </form > <a id ="logoutAnchor" href ="" > 退出</a > <script type ="text/javascript" > window .onload = function ( var anchor = document .getElementById ("logoutAnchor" ); anchor.onclick = function ( document .getElementById ("logoutForm" ).submit (); return false ; }; }; </script >
修改 configure(HttpSecurity security)方法
1
2
3
4
5
6
7
8
9
10
11
12
13
14
15
16
public class WebSecurityConfig extends WebSecurityConfigurerAdapter { @Override protected void configure (HttpSecurity security) throws Exception { security.authorizeRequests() …… .defaultSuccessUrl("/main.jsp" ); .and() .logout() .logoutUrl("/do/logout.html" ) .logoutSuccessUrl("/index.jsp" ); } }
通过 HttpSecurity 对象设置资源的角色要求 ,只要角色或权限有一个满足即可。再通过 AuthenticationManagerBuilder 对象设置用户登录时具备的角色
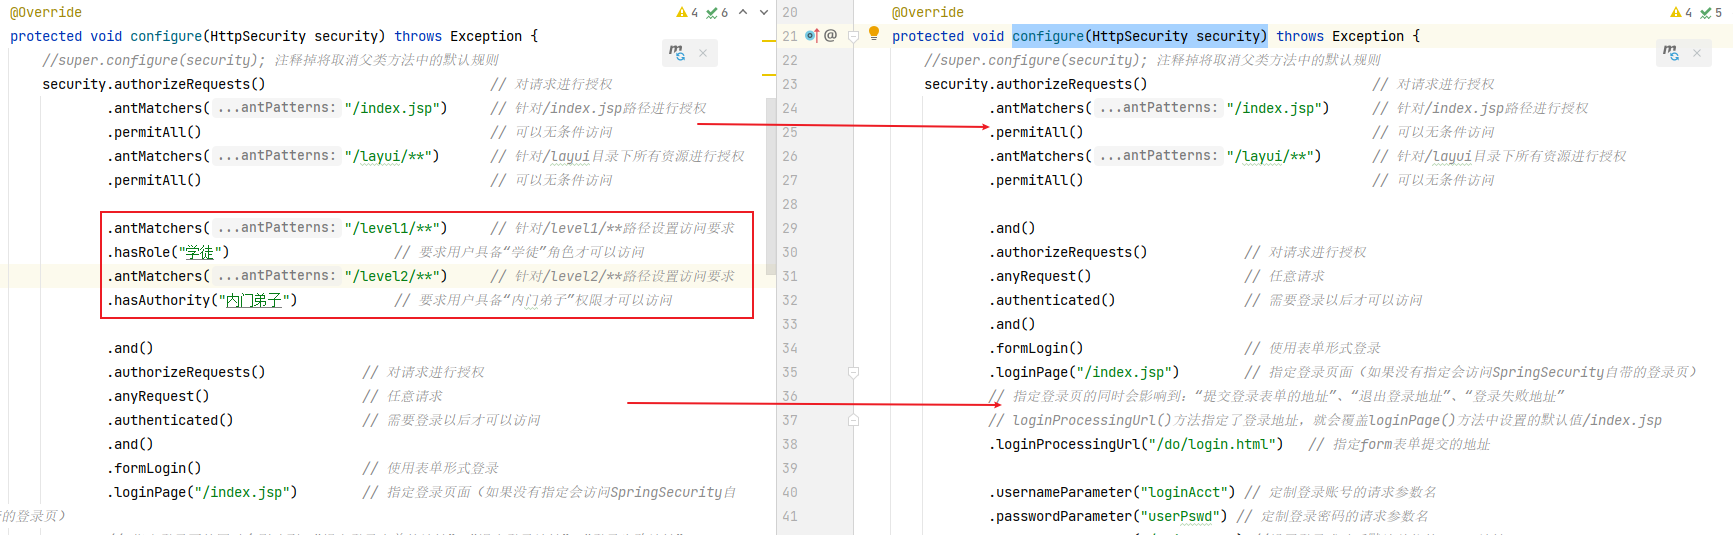
configure(HttpSecurity security)中规划权限,控制要访问的资源
1
2
3
4
5
6
7
8
9
10
11
12
13
14
15
16
17
18
public class WebSecurityConfig extends WebSecurityConfigurerAdapter { @Override protected void configure (HttpSecurity security) throws Exception { security.authorizeRequests() .antMatchers("/index.jsp" ) .permitAll() .antMatchers("/layui/**" ) .permitAll() .antMatchers("/level1/**" ) .hasRole("学徒" ) .antMatchers("/level2/**" ) .hasAuthority("内门弟子" ) …… .logoutSuccessUrl("/index.jsp" ); } }
注意设置权限的顺序,上面的要相对小。
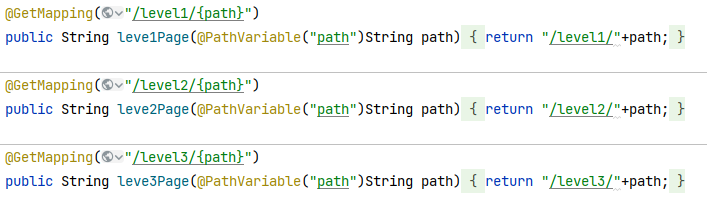
/level1/**等路径在 handler 中做了请求映射
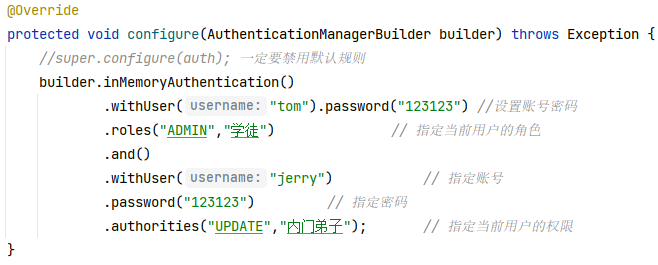
在 configure(AuthenticationManagerBuilder builder)中指定登录账号的角色/权限
1
2
3
4
5
6
7
8
9
10
11
@Override protected void configure (AuthenticationManagerBuilder builder) throws Exception { builder.inMemoryAuthentication() .withUser("tom" ).password("123123" ) .roles("ADMIN" ,"学徒" ) .and() .withUser("jerry" ) .password("123123" ) .authorities("UPDATE" ,"内门弟子" ); }
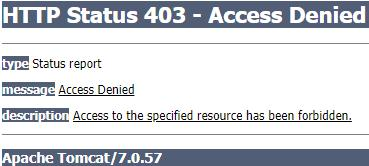
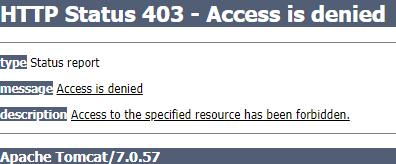
如果被拒绝,则报 403 错误
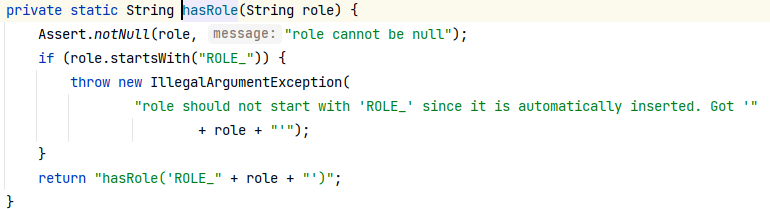
注意3 步:调用 hasRole()方法时,SpringSecurity 会在角色字符串前面加“ROLE_” 前缀 ,使用数据库时要注意。这也是 hasRole()方法和 hasAuthority()方法的区别
目前访问被拒绝时会跳转到 403 页面。
为了优化体验,在 configure(HttpSecurity security)方法中定义 403 后的跳转页面
方式一使用 handler 和 security 分类的方式
方式二利用了 AccessDeniedHandler 接口的匿名实现,冲洗了 handle 方法
1
2
3
4
5
6
7
8
9
10
11
12
13
14
15
16
17
18
19
20
@Override protected void configure (HttpSecurity security) throws Exception { security.authorizeRequests() …… .logoutSuccessUrl("/index.jsp" ) . and() .exceptionHandling() .accessDeniedHandler(new AccessDeniedHandler () { @Override public void handle (HttpServletRequest request, HttpServletResponse response, AccessDeniedException accessDeniedException) throws IOException, ServletException { request.setAttribute("message" , "抱歉!您无法访问这个资源!☆☆☆" ); request.getRequestDispatcher("/WEB-INF/views/no_auth.jsp" ).forward(request, response); } }); }
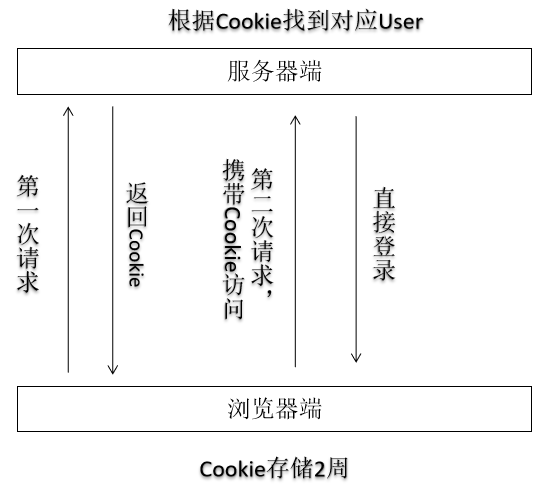
功能解释:第一次登陆后关闭浏览器,再次打开不需要登录。
在 configure(HttpSecurity security)方法中调用 rememberMe()方法 ,开启功能。
1
2
3
4
5
6
7
8
9
10
11
12
13
14
15
16
17
@Override protected void configure (HttpSecurity security) throws Exception { security.authorizeRequests() …… .accessDeniedHandler(new AccessDeniedHandler () { @Override public void handle (HttpServletRequest request, HttpServletResponse response, AccessDeniedException accessDeniedException) throws IOException, ServletException { request.setAttribute("message" , "抱歉!您无法访问这个资源!☆☆☆" ); request.getRequestDispatcher("/WEB-INF/views/no_auth.jsp" ).forward(request, response); } }) .and() .rememberMe(); }
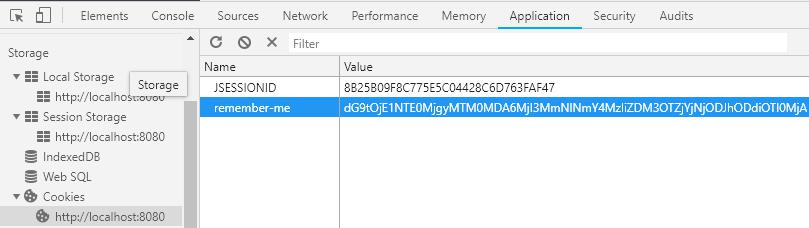
登录表单设置”记住我“checkbox,name 属性为"rember-me"
1 <input type ="checkbox" name ="remember-me" lay-skin ="primary" title ="记住我" />
原理:将账户信息保存到 cookie 中
个性化配置
1
2
3
4
.rememberMe() .rememberMeParameter("remember-me-new" ) .rememberMeCookieName("remember-me-cookie" ) .tokenValiditySeconds(2 * 24 * 60 * 60 );
okenValiditySeconds 用于设置 token 的有效期,即多长时间内可以免除重复登录,单位是秒。不修改配置情况下默认是 2 周。
通过 rememberMeParameter 设置 from 表单“自动登录”勾选框的参数名称。如果这里改了,from 表单中 checkbox 的 name 属性要对应的更改。如果不设置默认是 remember-me。
rememberMeCookieName 设置了保存在浏览器端的 cookie 的名称,如果不设置默认也是 remember-me。
上述记住我的方式将登录信息保存在内存中,虽然关闭浏览器不失效,但服务区重启后,本地保存的 cookie 与服务区的验证不一致,所以也无法通过,所以需要在数据库中保存登录状态更稳定。
添加数据库依赖
1 2 3 4 5 6 7 8 9 10 11 12 13 14 15 16 17 18 <dependency > <groupId > com.alibaba</groupId > <artifactId > druid</artifactId > <version > 1.1.12</version > </dependency > <dependency > <groupId > mysql</groupId > <artifactId > mysql-connector-java</artifactId > <version > 5.1.47</version > </dependency > <dependency > <groupId > org.springframework</groupId > <artifactId > spring-orm</artifactId > <version > 4.3.20.RELEASE</version > </dependency >
springmvc 配置文件中添加数据源
1 2 3 4 5 6 7 8 9 10 11 <bean id ="dataSource" class ="com.alibaba.druid.pool.DruidDataSource" > <property name ="username" value ="root" /> <property name ="password" value ="dimitre123" /> <property name ="url" value ="jdbc:mysql://localhost:13306/security?useSSL=false" /> <property name ="driverClassName" value ="com.mysql.jdbc.Driver" /> </bean > <bean id ="jdbcTemplate" class ="org.springframework.jdbc.core.JdbcTemplate" > <property name ="dataSource" ref ="dataSource" /> </bean >
这里还在数据库创建了 security 的数据库。
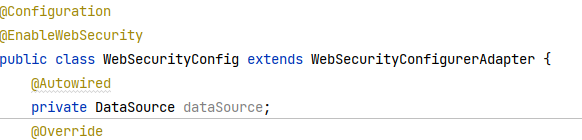
在配置类中注入数据源
在 configure(HttpSecurity security)方法中调用 tokenRepository()方法 ,开启令牌仓库功能
1
2
3
4
5
6
7
8
9
10
11
12
13
14
15
16
17
18
19
public class WebSecurityConfig extends WebSecurityConfigurerAdapter { @Autowired private DataSource dataSource; @Override protected void configure (HttpSecurity security) throws Exception { JdbcTokenRepositoryImpl tokenRepository = new JdbcTokenRepositoryImpl (); tokenRepository.setDataSource(dataSource); security.authorizeRequests() …… .and() .rememberMe() .tokenRepository(tokenRepository); } …… }
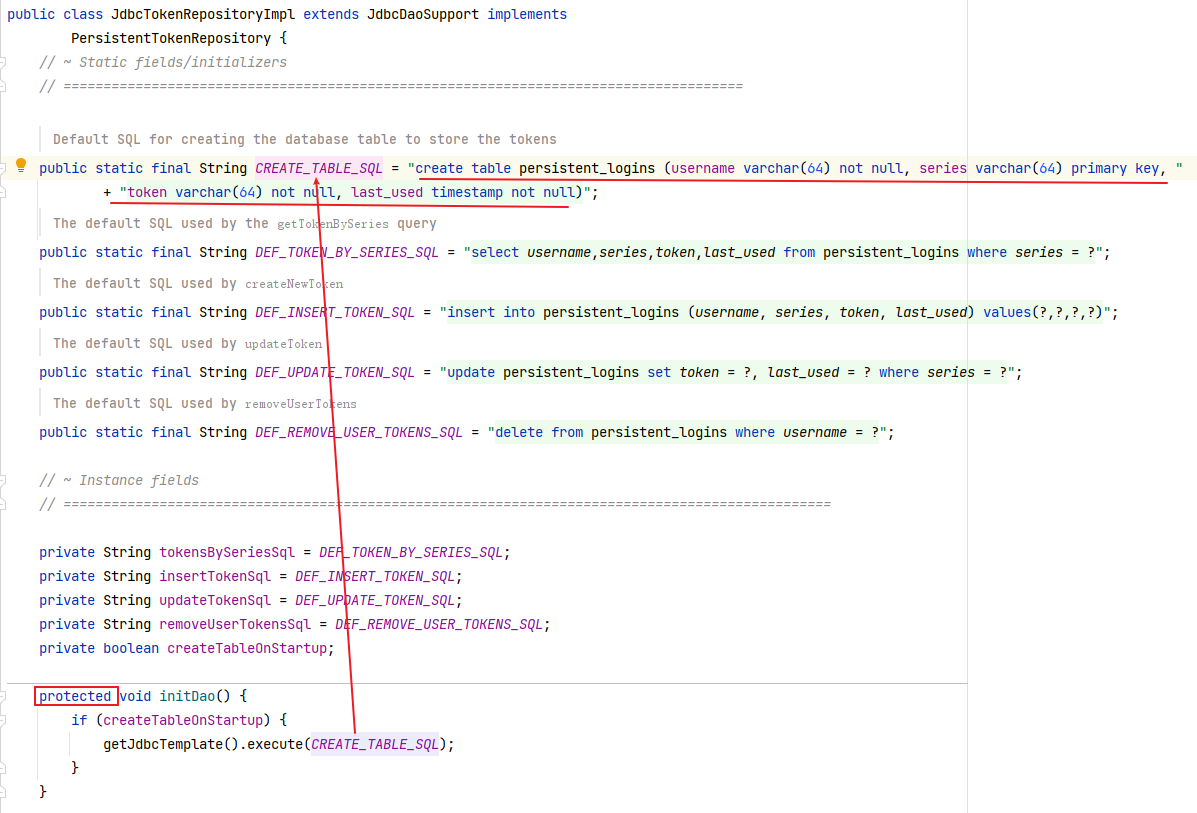
按照 JdbcTokenRepositoryImpl 中的代码创建数据库表:
1
2
3
4
5
6
CREATE TABLE persistent_logins ( username VARCHAR (64 ) NOT NULL, series VARCHAR (64 ) PRIMARY KEY, token VARCHAR (64 ) NOT NULL, last_used TIMESTAMP NOT NULL );
这里虽然 JdbcTokenRepositoryImpl 类中的 initDao()调用了创表语句,但是 initDao()不是自动执行,需要外部调用以下。
但是又因为 initDao()方法设置成了 protected 修饰,导致只能是同包或子类调用。
而 WebSecurityConfig 已经继承了 WebSecurityConfigurerAdapter,且让他继承 JdbcTokenRepositoryImpl 不合语义。
要么就按照上述的方式手动创建。
要么就修改源码,手动调用:创建一个一模一样的包,把 JdbcTokenRepositoryImpl 原封不动拷贝过来,WebSecurityConfig 中注入了 tokenRepository 后,执行 tokenRepository.initDao()
此时登录后关闭浏览器、重启服务器,只要 cookie 还在,就能自动登录,而退出登录,也会删除本地 cookie,删除数据库表。
前面的功能中,登录账号和密码写死在了方法中
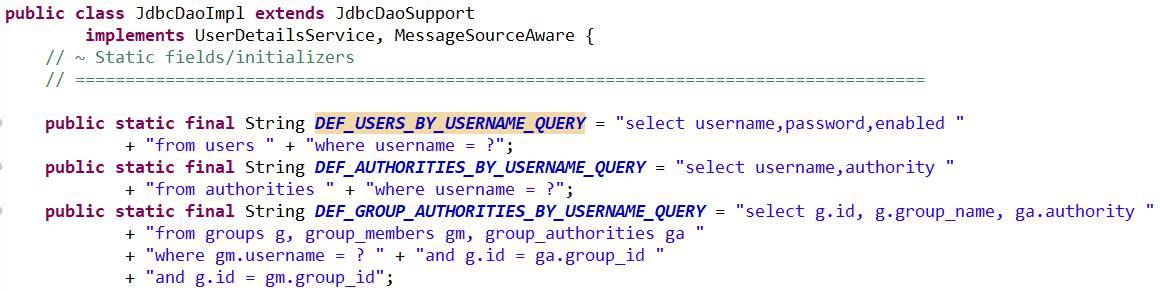
springsecurity中实现数据库登录使用的是configure(AuthenticationManagerBuilder builder)方法中的builder.jdbcAuthentication().usersByUsernameQuery("tom");,在usersByUsernameQuery("tom")等方法中最终调用 JdbcDaoImpl 类的方法查询数据库。 而 SpringSecurity 的默认实现已经将 SQL 语句硬编码在了JdbcDaoImpl 类中。
此时要利用 springsecurity 的功能,只有三个选择;
按照 JdbcDaoImpl 类中 SQL 语句设计表结构。(与项目的适配性不高)
修改 JdbcDaoImpl 类的源码。(使用了 mybatis 框架时,数据库操作通过 mybaits 执行,不经过 springsecurity)
不使用 jdbcAuthentication()。
创建数据库:
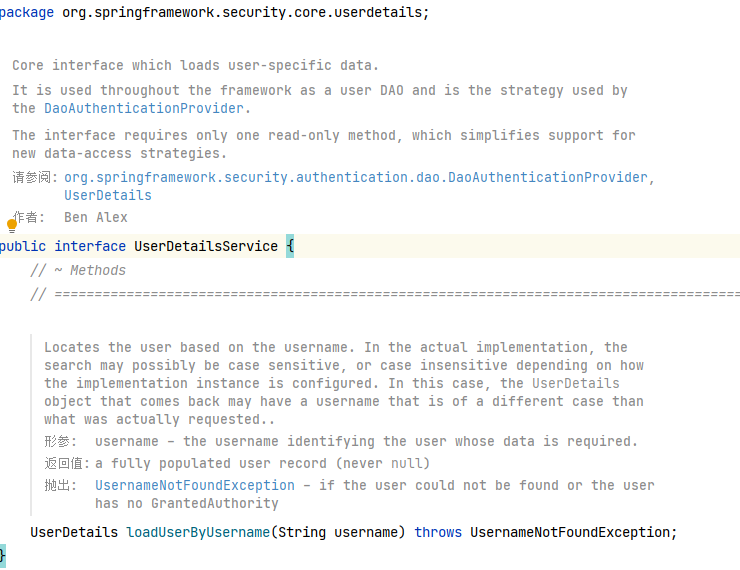
自定义数据库查询方法:创建自定义类,实现 userDetailsService 接口。
1
2
3
4
5
6
7
8
9
10
11
12
13
14
15
16
17
18
19
@Component public class MyUserDetailsService implements UserDetailsService { @Autowired private JdbcTemplate jdbcTemplate; @Override public UserDetails loadUserByUsername (String username) throws UsernameNotFoundException { String sql = "SELECT id,loginAcct,userPswd,username,email,cretaTime FROM t_admin WHERE loginAcct = ?" ; List<Admin> list = jdbcTemplate.query(sql, new BeanPropertyRowMapper <>(Admin.class)); Admin admin = list.get(0 ); String userPswd = admin.getUserPswd(); List<GrantedAuthority> authorities = new ArrayList <>(); authorities.add(new SimpleGrantedAuthority ("ROLE_ADMIN" )); authorities.add(new SimpleGrantedAuthority ("UPDATE" )); return new User (username, userPswd, authorities); } }
这里的 Admin 是 t_admin 的实体
User 是org.springframework.security.core.userdetails.User;
修正 configure(AuthenticationManagerBuilder builder)
1
2
3
4
5
6
7
8
9
10
11
12
13
14
15
16
17
18
19
20
21
22
23
@Configuration @EnableWebSecurity public class WebSecurityConfig extends WebSecurityConfigurerAdapter { @Autowired private DataSource dataSource; @Autowired private MyUserDetailsService myUserDetailsService; @Override protected void configure (HttpSecurity security) throws Exception { …… .usernameParameter("loginAcct" ) .passwordParameter("userPswd" ) .defaultSuccessUrl("/main.html" ) …… } @Override protected void configure (AuthenticationManagerBuilder builder) throws Exception { builder .userDetailsService(myUserDetailsService); } }
此时可以登陆了,但是我的没访问权限,老师的不知道怎么样。
configure(HttpSecurity security)方法中的 loginAcct 和 MyUserDetailsService 类中的没有关系,MyUserDetailsService 只是用到了 configure(HttpSecurity security)方法中获取到的参数值,没有用参数名。
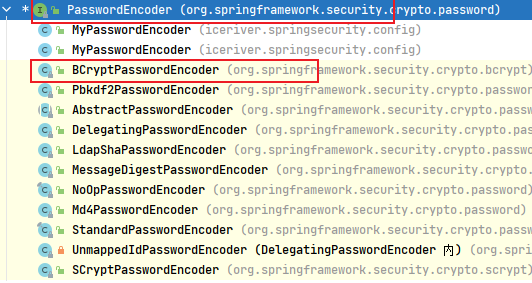
自定义类实现 org.springframework.security.crypto.password.PasswordEncoder 接口。 重写抽象方法:
encode()方法对明文进行加密。
matches()方法对明文加密后和密文进行比较
1
2
3
4
5
6
7
8
9
10
11
12
13
14
15
16
17
18
19
20
21
22
23
24
25
26
27
28
29
30
31
32
33
34
35
36
37
38
39
40
@Component public class MyPasswordEncoder implements PasswordEncoder { @Override public String encode (CharSequence rawPassword) { return privateEncode(rawPassword); } @Override public boolean matches (CharSequence rawPassword, String encodedPassword) { String formPassword = privateEncode(rawPassword); String databasePassword = encodedPassword; return Objects.equals(formPassword, databasePassword); } private String privateEncode (CharSequence rawPassword) { if (rawPassword == null || rawPassword.length() == 0 ) { throw new RuntimeException ("传入字符不能为空" ); } String algorithm = "md5" ; try { MessageDigest messageDigest = MessageDigest.getInstance(algorithm); byte [] bytes = ((String)rawPassword).getBytes(); byte [] digest = messageDigest.digest(bytes); int signum = 1 ; BigInteger bigInteger = new BigInteger (signum, digest); int radix = 16 ; String encoded = bigInteger.toString(radix).toUpperCase(); return encoded; } catch (NoSuchAlgorithmException e) { e.printStackTrace(); } return null ; } }
在 WebSecurityConfig 中进行使用
1
2
3
4
5
6
7
8
9
10
11
12
13
14
15
16
17
18
19
@Configuration @EnableWebSecurity public class WebSecurityConfig extends WebSecurityConfigurerAdapter { …… @Autowired private MyPasswordEncoder myPasswordEncoder; @Override protected void configure (HttpSecurity security) throws Exception { …… } @Override protected void configure (AuthenticationManagerBuilder builder) throws Exception { builder .userDetailsService(myUserDetailsService) .passwordEncoder(myPasswordEncoder); } }
md5 加密的问题:md5 使用 hash 值加密,一旦输入确定,输出就确定了。假如目前有个明文的密码库,当把它全部转成 md5 加密的字符串后,采用撞库的办法有可能猜出来。
以上问题可以采用循环进行 md5 加密、使用其他进制转换等方法避免。
但盐值加密是个更好的办法。
盐值加密介绍:
springseurity 提供了PasswordEncoder 接口的实现类BCryptPasswordEncoder,其内部使用了盐值加密的相关算法。
1
2
3
4
5
6
7
8
9
10
11
12
13
14
15
16
17
18
19
20
21
22
23
24
25
26
27
28
29
30
@Configuration @EnableWebSecurity public class WebSecurityConfig extends WebSecurityConfigurerAdapter { @Autowired private DataSource dataSource; @Autowired private MyUserDetailsService myUserDetailsService; @Bean BCryptPasswordEncoder getBCryptPasswordEncoder () { return new BCryptPasswordEncoder (); } @Autowired private BCryptPasswordEncoder myPasswordEncoder; @Override protected void configure (HttpSecurity security) throws Exception { …… } @Override protected void configure (AuthenticationManagerBuilder builder) throws Exception { …… builder .userDetailsService(myUserDetailsService) .passwordEncoder(myPasswordEncoder); } }
在初始化时或第一次请求时准备好过滤器链。具体任务由具体过滤器来完成。
org.springframework.security.web.context.request.async.WebAsyncManagerIntegrationFilter
org.springframework.security.web.context.SecurityContextPersistenceFilter
org.springframework.security.web.header.HeaderWriterFilter
org.springframework.security.web.csrf.CsrfFilter
org.springframework.security.web.authentication.logout.LogoutFilter
org.springframework.security.web.authentication.UsernamePasswordAuthenticationFilter
org.springframework.security.web.authentication.ui.DefaultLoginPageGeneratingFilter
org.springframework.security.web.authentication.www.BasicAuthenticationFilter
org.springframework.security.web.savedrequest.RequestCacheAwareFilter
org.springframework.security.web.servletapi.SecurityContextHolderAwareRequestFilter
org.springframework.security.web.authentication.AnonymousAuthenticationFilter
org.springframework.security.web.session.SessionManagementFilter
org.springframework.security.web.access.ExceptionTranslationFilter
org.springframework.security.web.access.intercept.FilterSecurityInterceptor
原文链接: https://sk370.github.io/2022/09/04/springsecurity/SpringSecurity/
版权声明: 转载请注明出处。