SpringBoot 是 Spring 官方整合的 Spring 框架,能够快速创建生产级别的 Spring 应用。
Spring 基础
熟悉 Maven
版本概览:
2.7.2 CURRENT GA (学习版本为:2.3.4.RELEASE)
3.0.0-SNAPSHOT SNAPSHOT
3.0.0-M4 PRE
环境要求(基于 Spring Boot 2.7.2):
Java:≥8
Spring Framework:≥5.3.22
Maven:≥3.5
Spring Boot 2.7.2 支持的 Servlet 容器版本:
Tomacat 9.0:4.0
Jetty 9.4:3.1
Jetty 10.0:4.0
Undertow 2.0:4.0
SpringBoot 是 Spring 官方整合的 Spring 框架,能够快速创建生产级别的 Spring 应用。
一句话介绍:
SpringBoot 是整合 Spring 技术栈的一站式框架【spring boot 是对 spring 框架整合的整合】
SpringBoot 是简化 Spring 技术栈的快速开发脚手架
优点:
创建独立 Spring 应用
内嵌 web 服务器
自动配置 Spring 以及第三方功能
提供生产级别的监控、健康检查及外部化配置
无代码生成、无需编写 XML
微服务是一种架构风格
一个应用拆分为一组小型服务
每个服务运行在自己的进程内,也就是可独立部署和升级
服务之间使用轻量级 HTTP 交互
服务围绕业务功能拆分
可以由全自动部署机制独立部署
去中心化,服务自治。服务可以使用不同的语言、不同的存储技术
分布式的难点
远程调用
服务发现
负载均衡
服务容错
配置管理
服务监控
链路追踪
日志管理
任务调度
分布式的解决
spring boot + spring cloud
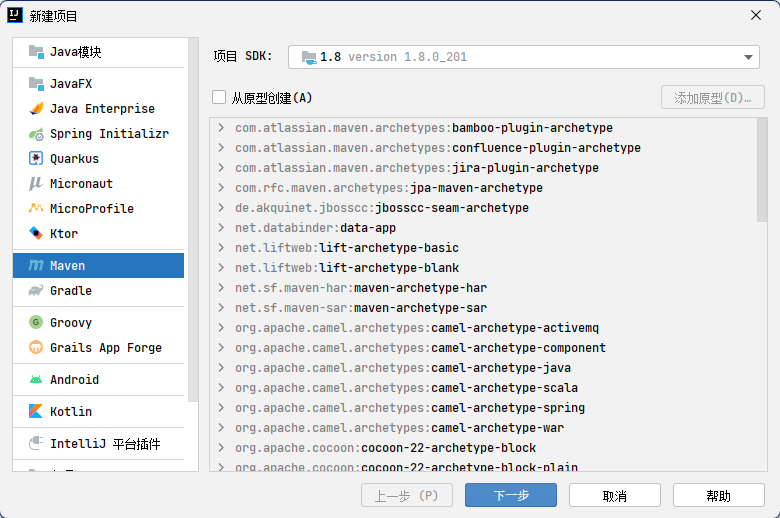
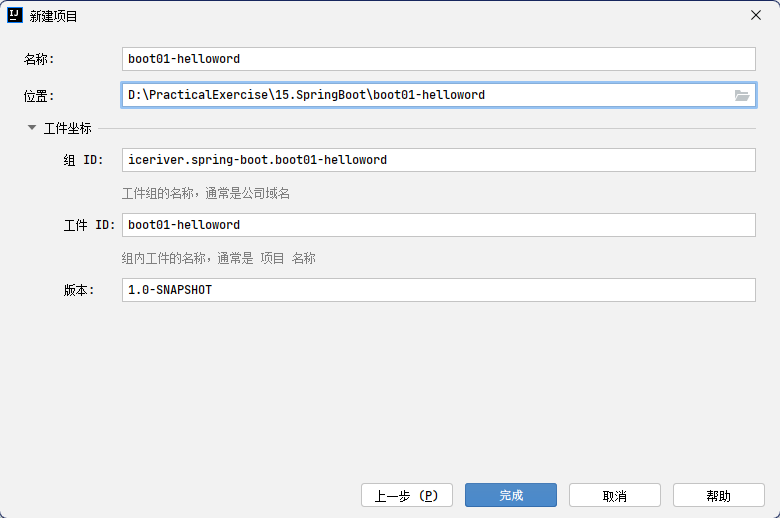
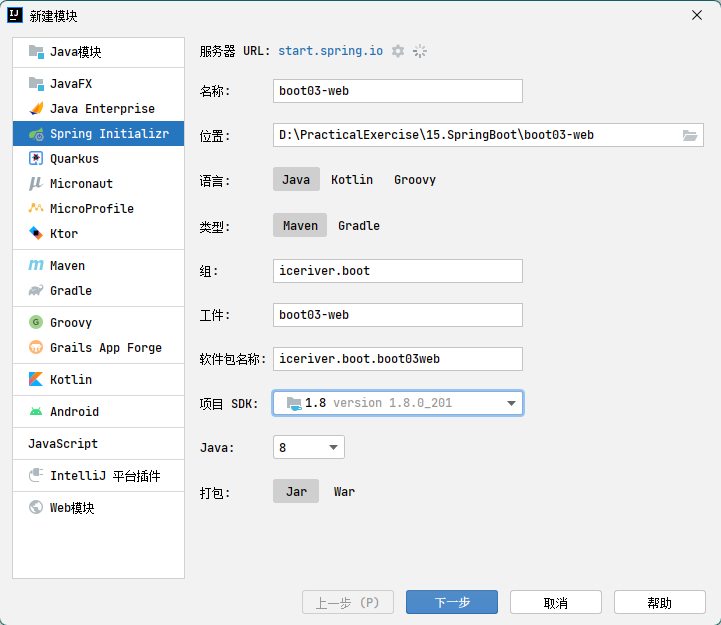
创建 maven 工程
pom.xml 文件中引入依赖
1 2 3 4 5 6 7 8 9 10 11 12 <parent > <groupId > org.springframework.boot</groupId > <artifactId > spring-boot-starter-parent</artifactId > <version > 2.3.4.RELEASE</version > </parent > <dependencies > <dependency > <groupId > org.springframework.boot</groupId > <artifactId > spring-boot-starter</artifactId > </dependency > </dependencies >
spring-boot-starter :核⼼模块,包括⾃动配置⽀持、⽇志和 YAML
添加 test 模块
1 2 3 4 5 <dependency > <groupId > org.springframework.boot</groupId > <artifactId > spring-boot-starter-test</artifactId > <scope > test</scope > </dependency >
spring-boot-starter-test :测试模块,包括 JUnit、 Hamcrest、 Mockito
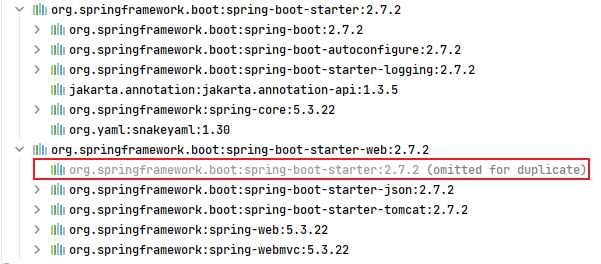
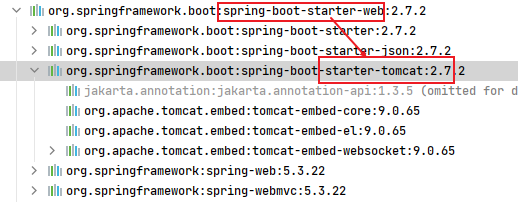
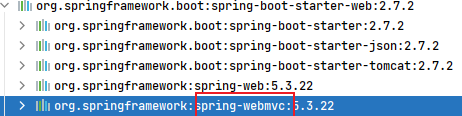
添加 web 模块
1 2 3 4 <dependency > <groupId > org.springframework.boot</groupId > <artifactId > spring-boot-starter-web</artifactId > </dependency
从上图可以看到 web 模块依赖于 boot-starter 模块。
web 模块比 boot-starter 模块多引入了 json、tomcat、web、webmvc 四个模块
总结:只需要引入 web 模块即可,boot-starter 模块会依赖传递加载。
src/main/java/iceriver.boot 包下创建主程序,名称任意
1
2
3
4
5
6
7
8
9
10
11
12
13
14
package iceriver.boot;import org.springframework.boot.SpringApplication;@SpringBootApplication public class MainApplication { public static void main (String[] args) { SpringApplication.run(MainApplication.class,args); } }
src/main/java/iceriver.boot.controller 包下创建处理请求的控制器
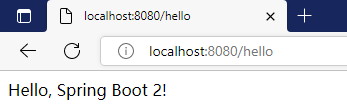
1
2
3
4
5
6
7
8
9
10
11
12
13
14
15
16
package iceriver.boot.controller;import org.springframework.web.bind.annotation.RequestMapping;import org.springframework.web.bind.annotation.RestController;@RestController public class HelloController { @RequestMapping("/hello") public String handle01 () { return "Hello, Spring Boot 2!" ; } }
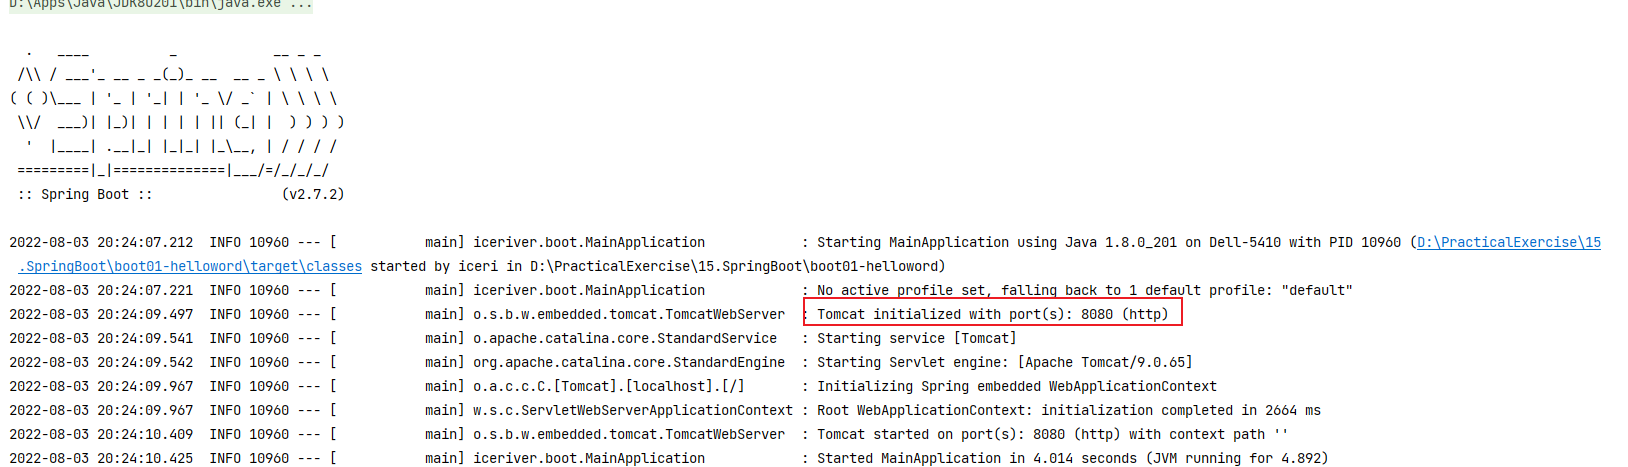
运行 src/main/java/iceriver.boot 包下的主程序 main 方法
浏览器访问http://localhost:8080/hello
修改端口号:在 resources 目录下创建 application.properties 文件【文件名称固定,称为核心配置文件】
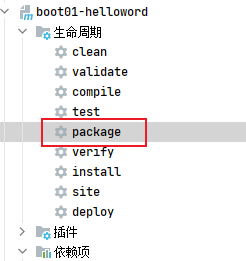
部署:
1 2 3 4 5 6 7 8 <build > <plugins > <plugin > <groupId > org.springframework.boot</groupId > <artifactId > spring-boot-maven-plugin</artifactId > </plugin > </plugins > </build >
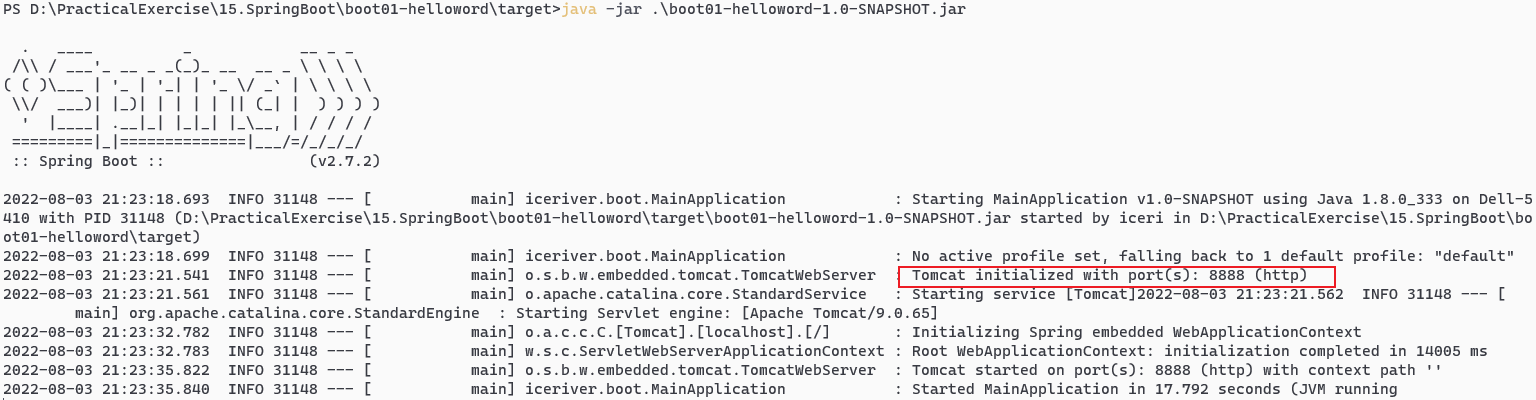
执行 maven 打包命令:
执行java -jar jar包名命令
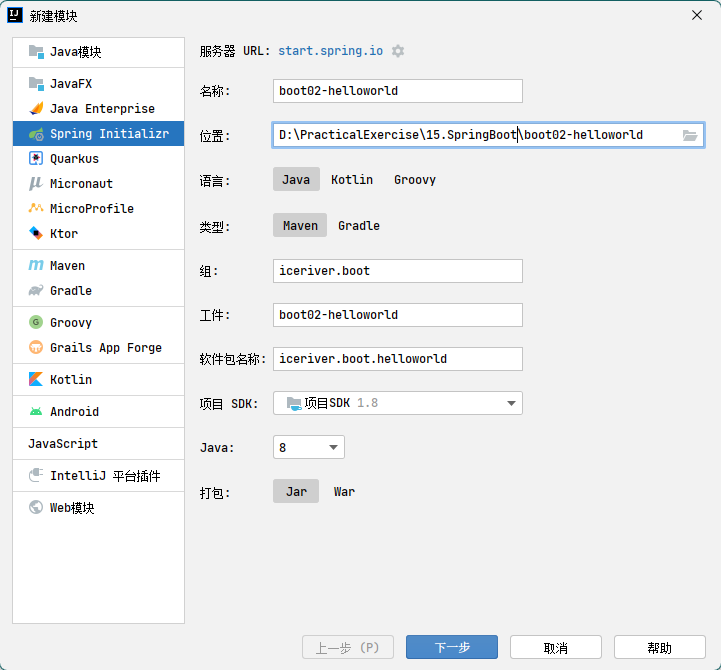
创建工程/模块
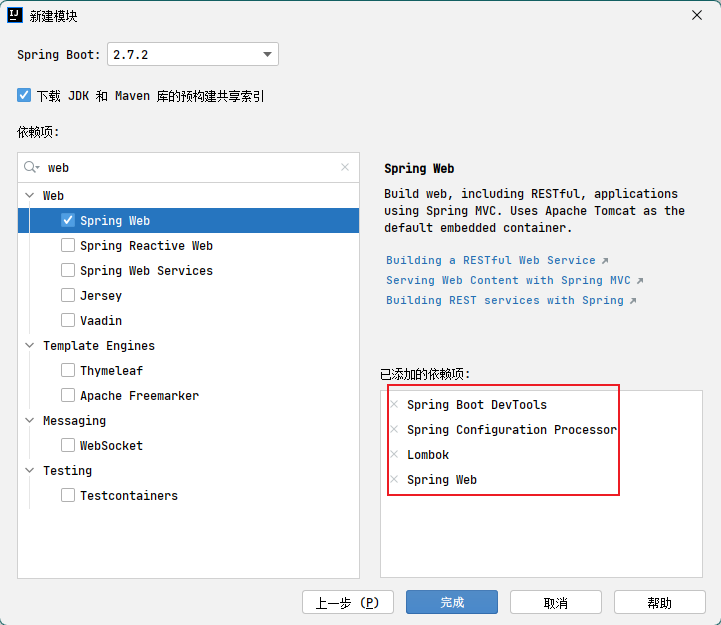
选择需要的依赖
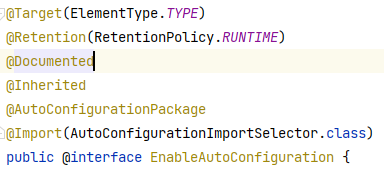
@Configuration
将类声明为配置类,【参见 Spring5 4.5 完全注解开发02.Spring5 】
@Configuration(proxyBeanMethods = true)默认为 true,此时 Spring Boot 总会检查这个组件是否在容器中存在,存在时不会再创建。
此时不论是通过 MainApplication.java 主程序从容器获取组件
还是从配置类 MyConfig.java 的方法获取组件,都是同一个对象(单实例)
1
2
3
4
5
6
7
8
9
10
11
12
13
14
15
16
17
18
19
20
21
22
23
24
25
26
27
28
29
30
31
32
33
34
35
36
package iceriver.boot;import iceriver.boot.bean.Pet;import iceriver.boot.bean.User;import iceriver.boot.config.MyConfig;import org.springframework.boot.SpringApplication;import org.springframework.boot.autoconfigure.SpringBootApplication;import org.springframework.context.ConfigurableApplicationContext;@SpringBootApplication public class MainApplication { public static void main (String[] args) { ConfigurableApplicationContext run = SpringApplication.run(MainApplication.class, args); String[] names = run.getBeanDefinitionNames(); for (String name : names) { System.out.println(name); } Pet tom01 = run.getBean("tom" , Pet.class); Pet tom02 = run.getBean("tom" , Pet.class); System.out.println(tom01 == tom02); MyConfig bean = run.getBean(MyConfig.class); User user = bean.user01(); User user1 = bean.user01(); System.out.println(user == user1); } }
@Configuration(proxyBeanMethods = false)时:
通过 MainApplication.java 主程序从容器获取组件是同一个对象
从配置类 MyConfig.java 的方法获取组件,不是同一个对象
⭐ 该配置为 true 时,解决了组件依赖问题:比如 User 类中有 Pet 类的对象,因为在创建 User 时,执行到创建 Pet 对象时,使用的是配置类调用方法创建 Pet 对象:
设置为 true:跳过了调用方法创建 Pet 对象,直接在容器中调用,保证了 User 对象也是唯一的。
设置为 false:调用方法创建 Pet 对象,由于 Pet 对象不一致,导致 User 对象不一致,创建 User 组件在容器中出现了两个
最佳实战
配置类组件之间无依赖关系用 Lite 模式加速容器启动过程,减少判断,设置为 false
配置类组件之间有依赖关系,方法会被调用得到之前单实例组件,用 Full 模式,设置为 true
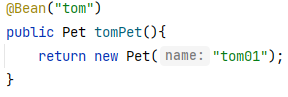
@Bean
给容器中添加组件,用在方法前,方法名为组件 id,返回类型为组件类型,返回值为组件在容器中的实例。
可以使用如下的方式@Bean("tom")使用自定义名称(不以方法名作为组件名)
通过 MainApplication.java 主程序从容器获取组件:
1
2
3
4
5
6
7
8
9
10
11
12
13
14
15
16
17
18
19
20
21
22
package iceriver.boot.config;import iceriver.boot.bean.Pet;import iceriver.boot.bean.User;import org.springframework.context.annotation.Bean;import org.springframework.context.annotation.Configuration;@Configuration public class MyConfig { @Bean public User user01 () { return new User ("张三" , 18 ); } @Bean("tom") public Pet tomPet () { return new Pet ("tom01" ); } }
1
2
3
4
5
6
7
8
9
10
11
12
13
14
15
16
17
18
19
20
21
22
23
24
25
26
27
28
29
package iceriver.boot;import iceriver.boot.bean.Pet;import org.springframework.boot.SpringApplication;import org.springframework.boot.autoconfigure.SpringBootApplication;import org.springframework.context.ConfigurableApplicationContext;@SpringBootApplication public class MainApplication { public static void main (String[] args) { ConfigurableApplicationContext run = SpringApplication.run(MainApplication.class, args); String[] names = run.getBeanDefinitionNames(); for (String name : names) { System.out.println(name); } Pet tom01 = run.getBean("tom" , Pet.class); Pet tom02 = run.getBean("tom" , Pet.class); System.out.println(tom01 == tom02); } }
通过 MainApplication.java 主程序从容器获取配置类组件:
配置类是被 EnhancerBySpringCGLIB 增强了的代理类
1
2
3
4
5
6
7
8
9
10
11
12
13
14
15
16
17
18
19
20
21
22
23
24
25
26
package iceriver.boot;import iceriver.boot.config.MyConfig;import org.springframework.boot.SpringApplication;import org.springframework.boot.autoconfigure.SpringBootApplication;import org.springframework.context.ConfigurableApplicationContext;@SpringBootApplication public class MainApplication { public static void main (String[] args) { ConfigurableApplicationContext run = SpringApplication.run(MainApplication.class, args); String[] names = run.getBeanDefinitionNames(); for (String name : names) { System.out.println(name); } System.out.println(run.getBean(MyConfig.class)); } }
@Component、@Controller、@Service、@Repository 【参见 Spring5 2.3.102.Spring5 】
指定包扫描的路径,【参见 2.3.402.Spring5 】
可以用在任何组件上,配合任何组件注解使用。
导入任意指定类型的组件:
@Import({User.class, DBHelper.class})给容器中自动创建出这两个类型的组件、默认组件的名字就是全类名(调用其无参构造器创建)
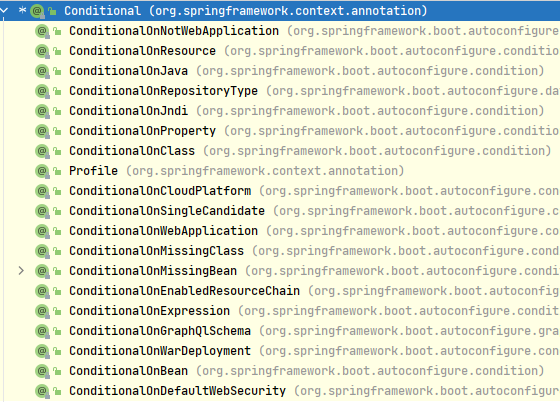
条件装配:满足指定条件,则进行注入
可以用在方法前,表示满足该条件,则对该方法进行 bea 注入
可以用在类前,表示满足该条件,才对该类中的方法进行 ben 注入。
用在 JavaBean 前,声明当前文件为一个配置文件类。
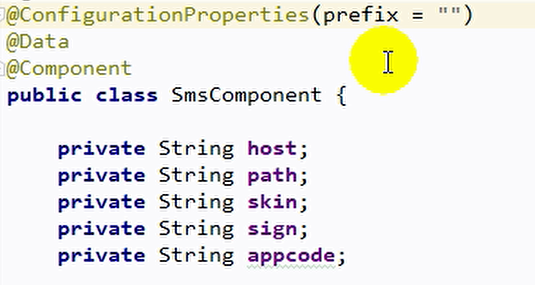
将 JavaBean 属性的值写在配置文件中,通过 spring boot 读取 properties 配置文件,并把它封装到 JavaBean 中。
@ConfigurationProperties(prefix = "mycar")
需要与@Component 配合使用,将 JavaBean 通过@Component 声明为组件。
或者不使用@Component,在 MyConfig.java 中使用@Bean 创建组件,方法返回无参构造对象
对于无法对 JavaBean 使用@Component 的组件(如别人的 JavaBean),在 MyConfig.java 配置类前使用@EnableConfigurationProperties(Car.Class)——只能用在配置类上
作用 1:开启 Car 的配置绑定功能
作用 2:将 Car 这个组件自动注册到容器中
ConfigurationProperties 将当前类与配置文件中的值绑定。绑定的只能是核心配置文件,只会在核心配置文件中查找值。
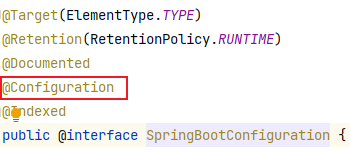
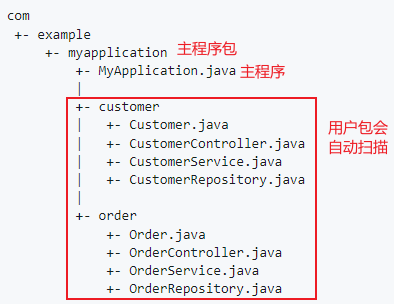
将某个类指定为主程序类/主配置类。他自动扫描的路径是同级的其他路径,同下@ComponentScan(“iceriver.boot”)
它是三个组件的合成:
@SpringBootConfiguration
@EnableAutoConfiguration
@ComponentScan(“iceriver.boot”)
代表当前是一个配置类。
@AutoConfigurationPackage:导入主程序类所在位置的包下一系列组件。指定了默认的包规则。
1
2
3
4
5
@Import(AutoConfigurationPackages.Registrar.class) public @interface AutoConfigurationPackage {}
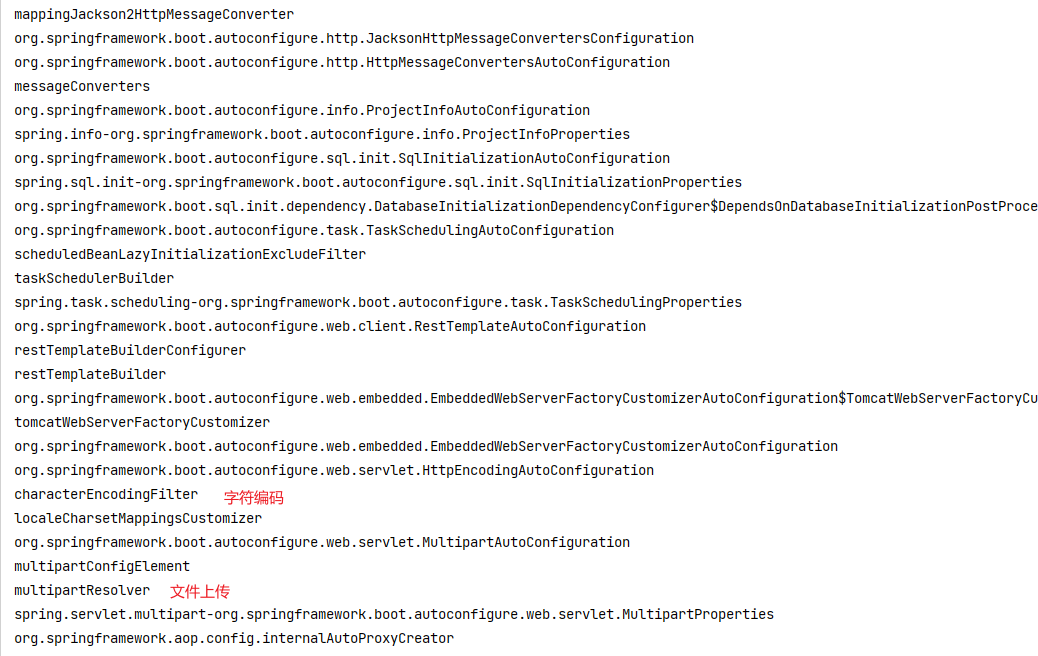
@Import(AutoConfigurationImportSelector.class):导入 META-INF/spring.factories 位置的文件中配置的组件(共 127 个,加载时全部加载,但使用时由于使用了@ConditionalOnClass 注解,可以实现按需配置,用户导入相关的场景启动器后才会激活该注解)
1
2
3
4
5
6
7
8
9
10
1 、利用getAutoConfigurationEntry(annotationMetadata);给容器中批量导入一些组件2 、调用List<String> configurations = getCandidateConfigurations(annotationMetadata, attributes)获取到所有需要导入到容器中的配置类3 、利用工厂加载 Map<String, List<String>> loadSpringFactories (@Nullable ClassLoader classLoader) ;得到所有的组件4 、从META-INF/spring.factories位置来加载一个文件。 默认扫描我们当前系统里面所有META-INF/spring.factories位置的文件 spring-boot-autoconfigure-2.3 .4 .RELEASE.jar包里面也有META-INF/spring.factories 文件里面写死了spring-boot一启动就要给容器中加载的所有配置类 虽然我们127 个场景的所有自动配置启动的时候默认全部加载。xxxxAutoConfiguration 按照条件装配规则(@Conditional ),最终会按需配置。
组件扫描
扫描到的组件如果有第二组的注解,则自动注册为组件
用户项目使用了 spring-boot-starter-parent 作为父项目进行依赖管理。
spring-boot-starter-parent 使用了 spring-boot-dependencies 作为父项目进行依赖管理。而 spring-boot-dependencies 中声明了几乎开发中常用的依赖版本号——自动仲裁机制。
依赖中 spring-boot-starter-*称为场景启动器,是一组整合好的方便的依赖描述符。只要引入 starter,满足该场景的常规依赖都会自动引入。
spring-boot-starter-web 底层基础依赖是 spring-boot-starter,是所有场景启动最底层的依赖。
*-spring-boot-starter: 第三方提供的简化开发的场景启动器。
自动配置好 tomcat
spring-boot-starter-web 场景启动器引入了 tomcat 场景启动器
自动配置好 SpringMVC
spring-boot-starter-web 场景启动器引入了 springmvc 场景启动器
自动配置好了 springmvc 的常用组件(依赖)
配置好了 SpringMVC DispatcherServlet 以及其他依赖,如 jdbc、日志、字符编码等。
创建了默认的包结构:
官方文档 2.1 节,说明了使用默认的包结构,会自动进行包扫描,而不需要手动设置
当然可以通过@SpringBootApplication(scanBasePackages = "iceriver.boot")扫描指定包
或者使用@ComponentScan(scanBasePackages = "iceriver.boot")、@EnableAutoConfiguration、@SpringBootConfiguration三个代替
各种配置拥有默认值。如文件上传设定了最大上传大小
默认配置最终都是映射到某个类上,如:MultipartProperties
修改配置时,application.properties配置文件的值最终会绑定每个类上,这个类会在容器中创建对象
按需加载所有自动配置项
springBoot 所有的自动配置功能都在 spring-boot-autoconfigure 包里面
引入了哪些场景这个场景的自动配置才会开启
【参见2.8https://www.yuque.com/zhuyuqi/zna9x5/gs0vv5#uvJdT 】
SpringBoot 先加载所有的自动配置类 xxxxxAutoConfiguration
每个自动配置类按照条件进行生效,默认都会绑定配置文件指定的值。xxxxProperties 里面拿。xxxProperties 和配置文件进行了绑定
生效的配置类就会给容器中装配很多组件
只要容器中有这些组件,相当于这些功能就有了
定制化配置
用户直接自己@Bean 替换底层的组件
用户去看这个组件是获取的配置文件什么值就去修改。
xxxxxAutoConfiguration —> 组件 —> xxxxProperties 里面拿值 ----> application.properties
查看自动配置了哪些(选做)
自己分析,引入场景对应的自动配置一般都生效了
application.properties 核心配置文件中 debug=true 开启自动配置报告。在控制台输出中查看:Negative(不生效)\Positive(生效)
是否需要修改
自己分析。xxxxProperties 绑定了配置文件的哪些。
自定义加入或者替换组件
自定义器 XXXXXCustomizer .
springboot 启动,读取 spring-boot-autoconfigure-2.7.2.jar 包下的/META-INF/spirng.factories 文件。读取 org.springframework.boot.autoconfigure.EnableAutoConfiguration 属性的值加载自动配置类。
根据自动配置类中指定的 XxxProperties 类设置自动配置的属性值,程序员根据 XxxProperties 类中指定的属性在 yml 配置文件中修改自动配置。
springboot 通过@ConditionalXxx 注解指定特定组件加入 IOC 容器时所需要的特定条件,条件满足时才会加入 IOC 容器。
简化 JavaBean 开发
pom.xml 中引入 lombok
1 2 3 4 <dependency > <groupId > org.projectlombok</groupId > <artifactId > lombok</artifactId > </dependency >
安装 Lombok 插件
使用:
JavaBean 只编写属性,不写 getter 和 setter
JavaBean 前使用@Data 注解,会在编译时生成 getter 和 setter
javabean 前使用@ToString,会在编译时自动生成 toString()
JavaBean 前使用@AllArgsConstructor 注解,会在编译时生成全部参数的有参构造器
JavaBean 前使用@NoArgsConstructor 注解,会在编译时生成无参构造器
JavaBean 前使用@EqualsAndHashCode 注解,会在编译时生成 equals()和 hashcode()
JavaBean 前使用@Slf4j 注解,可以在代码中使用log.info("str")语法在控制台输出内容
重启 restart 功能:
引入依赖
1 2 3 4 5 <dependency > <groupId > org.springframework.boot</groupId > <artifactId > spring-boot-devtools</artifactId > <optional > true</optional > </dependency >
使用:ctrl+f9
本质:和 idea 重启效果一样
1 2 3 4 5 <dependency > <groupId > org.springframework.boot</groupId > <artifactId > spring-boot-configuration-processor</artifactId > <optional > true</optional > </dependency >
1
2
3
4
5
6
7
8
9
10
11
12
@Configuration @ConfigurationProperties(prefix = "short.message") @Data @NoArgsConstructor @AllArgsConstructor public class ShortMessageProperties { private String accessKeyId; private String accessKeySecret; private String endpoint; private String signName; private String templateCode; }
同时配置了.properties和.yml,两个文件会同时生效,里面的内容.properties会覆盖.yml
简介:YAML 是 “YAML Ain’t Markup Language”(YAML 不是一种标记语言)的递归缩写。在开发的这种语言时,YAML 的意思其实是:“Yet Another Markup Language”(仍是一种标记语言)。
基本语法:
key: value;kv 之间有空格
大小写敏感
使用缩进表示层级关系
缩进不允许使用 tab,只允许空格
缩进的空格数不重要,只要相同层级的元素左对齐即可
'#'表示注释
字符串无需加引号,如果要加,''与""表示字符串内容会原样输出字符串/将转义字符转换
数据类型
字面量(k: v):单个的、不可再分的值。date、boolean、string、number、null
对象:键值对的集合。map、hash、set、object
1 2 3 4 5 6 7 k: {k1:v1 ,k2:v2 ,k3:v3 }k: k1: v1 k2: v2 k3: v3
数组:一组按次序排列的值。array、list、queue
1 2 3 4 5 6 7 k: [v1 ,v2 ,v3 ]k: - v1 - v2 - v3
给自定义的类和配置文件添加输入提示
引入依赖
1 2 3 4 5 <dependency > <groupId > org.springframework.boot</groupId > <artifactId > spring-boot-configuration-processor</artifactId > <optional > true</optional > </dependency >
打包时排除,减少资源占用(对开发没有影响)
1 2 3 4 5 6 7 8 9 10 11 12 13 14 15 16 <build > <plugins > <plugin > <groupId > org.springframework.boot</groupId > <artifactId > spring-boot-maven-plugin</artifactId > <configuration > <excludes > <exclude > <groupId > org.springframework.boot</groupId > <artifactId > spring-boot-configuration-processor</artifactId > </exclude > </excludes > </configuration > </plugin > </plugins > </build >
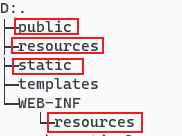
在 resources 路径下:静态资源放在/static (/public 、/resources、/META-INF/resources路径下,则可以直接通过当前项目根路径/+静态资源名的方式访问到。
原理:浏览器地址栏的请求首先经过 spring mvc 的 dispatcherServlet 处理,如果控制器 controller 中有对应的请求方法,则按该方法处理。如果没有对应的请求方法,则被 servlet 默认的控制器处理,直接去访问静态资源。
修改静态资源访问前缀
控制器中设定的拦截请求为/**所有请求,这样会导致静态资源的访问和控制器处理的请求都被拦截。
开发中一般希望将静态资源内的访问、和控制器处理前端请求分离开,所以一般会在核心配置文件中间通过spring.mvc.static-path-pattern=/res/**给静态资源的访问增加前缀(res 可以设定为其他名字)
1
2
3
spring: mvc: static-path-pattern: /res/**
此时访问地址形式为:当前项目路径/res/静态资源名
修改静态资源的路径(自定义静态资源路径)
在核心配置文件中通过spring.resources.static-locations=[class:/hh/]进行配置
1
2
3
4
5
6
spring: mvc: static-path-pattern: /res/** resources: static-locations: [classpath:/haha/ ]
访问时,地址形式为:当前项目路径/res/静态资源名【访问路径没变化,变的只是静态资源的位置】
访问 webjar
1 2 3 4 5 <dependency > <groupId > org.webjars</groupId > <artifactId > jquery</artifactId > <version > 3.5.1</version > </dependency >
欢迎页(index.html 页面)
把 index.html 当作静态资源,放在相关路径下即可解析为首页,访问当前项目路径即可作为欢迎页。
注意:静态资源访问前缀会影响访问地址,访问时需要加上访问前缀
也可以通过控制器编写 index 方法,路径用/,映射到 index 页面
自定义 Favicon
放到静态资源路径下,起名为favicon.ico,则每个页面都会带上小图标
注意:静态资源访问前缀会影响,访问带有访问前缀的的页面才会显示。
小图标保存在 session 中共享
spring boot 启动时,加载的 springmvc 的自动配置类 WebMvcAutoConfiguration 生效。
【25 集,没看下去】
请求映射(restful 风格):spring boot 启动时 WebMvcAutoConfiguration 自动配置了 OrderedHiddenHttpMethodFilter 类,该类继承自HiddenHttpMethodFilter,从而能够处理 restful 风格的请求。
但默认情况下,spring.mvc.hiddenmethod.filter 值是 false,即使设置了隐藏域,发送 put、delete 请求时还是 post 请求。
只有在核心配置文件中将 spring.mvc.hiddenmethod.filter=true 后,才可以正常发送 put、delete 请求。
这个配置只针对于 form 表单使用
对于 postman 等这些能直接发送 put、delete 请求的不用配置
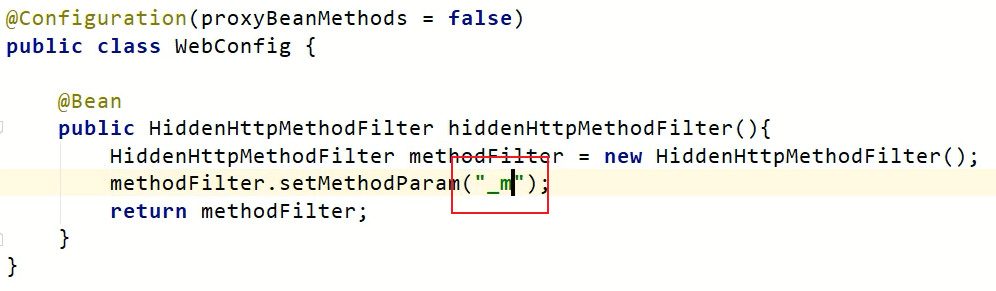
自定义请求方法时,在配置类中重新定义(此时隐藏域的 name 属性要设置为_m(原始为_method)):
请求映射处理原理(怎么知道是哪种请求):
【参见 SpringMVC10.303.Spring MVC 】
servlet 处理请求的方法是 doService(),doService()经过一大堆封装、重写之后变成了 DispatcherServlet 的 doDispatcher(),该方法中调用了 getHandler()得到所有 handlermappings,去看哪个 handlerMapping 能处理得到的请求
RequestMappingHandlerMapping :保存了所有@RequestMapping 和 handler 的映射规则。WelcomePageHandlerMapping:是 springBoot 自动配置的,处理 index 页面(欢迎页)的请求,默认配置好了。
自定义 HandlerMapping【没讲】
注解:
请求映射注解:
@RequestMapping@GetMapping、@PostMapping、@PutMapping、@DeleteMapping
请求传参注解:
@PathVariable:路径占位符,将请求路径解析为参数(restful 请求)
@RequestHeader:03.Spring MVC
@ModelAttribute
@RequestParam:
@MatrixVariable:矩阵变量
请求参数以分号分割,如/cars/{low=34;brand=byd,audi}
springBoot 默认仅用了矩阵变量,需要在核心配置文件中手动开启:
urlpathhelper 需要单独写一章
@CookieValue
@RequestBody:
@RequestAttribute:从请求域获取参数
1 2 3 4 <dependency > <groupId > org.springframework.boot</groupId > <artifactId > spring-boot-starter-web</artifactId > </dependency >
1 2 3 4 5 <dependency > <groupId > org.mybatis.spring.boot</groupId > <artifactId > mybatis-spring-boot-starter</artifactId > <version > 1.1.1</version > </dependency >
spring 官方没有提供 mybtis 的 starer,这是 mybatis 官方提供的,在 spring-boot-dependencies 里就没有管理的依赖版本,所以要引入版本号。
1 2 3 4 5 6 7 8 9 10 <dependency > <groupId > mysql</groupId > <artifactId > mysql-connector-java</artifactId > <version > 5.1.21</version > </dependency > <dependency > <groupId > com.alibaba</groupId > <artifactId > druid</artifactId > <version > 1.0.5</version > </dependency >
在 application.properties 文件中配置 mysql 数据源
1
2
3
4
spring.datasource.url =jdbc:mysql://localhost:3306/test spring.datasource.username =root spring.datasource.password =123456 spring.datasource.driver-class-name =com.mysql.jdbc.Driver
数据库驱动使用 com.mysql.cj.jdbc.Driver 时,则 datasource.url 必须带时区,即spring.datasource.url=jdbc:mysql://localhost:3306/test?serverTimezone=UTC
建立好数据库,创建好对应的 Javabean。
编写 XxxMapper 类,制定好方法。
在 resources/mybatis/mapper 下创建好对应的 XxxMapper.xml 映射文件,写好 sql 语句。
在 application.properties 文件中配置 mybatis 的映射文件路径:
1 mybtis.mapper.location :classpath*./mybatis/mapper/*Mapper.xml
为了能在控制台打印 sql 语句,再在 application.properties 文件中配置 mapper 的日志打印级别。
1 logging.level.XxxMapper的全包名.debug
主启动类使用@MapperScan(“com.atguigu.crowd.mysql.mapper”)注解扫描所有类,或者使用@Mapper 标记单个类
如果不创建*Mapper.xml 的映射文件(也就没在 application.properties 文件中声明映射文件路径),则需要在 XxxMapper 类中使用注解指定 sql 语句,如:
1
2
3
4
5
6
7
@Mapper public interface UserMapper { @Select("SELECT * FROM USER WHERE NAME = #{name}") User findByName (@Param("name") String name) ; @Insert("INSERT INTO USER(NAME, AGE) VALUES(#{name}, #{age})") int insert (@Param("name") String name, @Param("age") Integer age) ; }
1 2 3 4 <dependency > <groupId > org.springframework.boot</groupId > <artifactId > spring-boot-starter-redis</artifactId > </dependency >
1
2
3
4
5
6
spring.redis.host =localhost spring.redis.port =6379 spring.redis.pool.max-idle =8 spring.redis.pool.min-idle =0 spring.redis.pool.max-active =8 spring.redis.pool.max-wait =-1
1 2 3 4 <dependency > <groupId > org.springframework.boot</groupId > <artifactId > spring-boot-starter-thymeleaf</artifactId > </dependency >
原文链接: https://sk370.github.io/2022/08/02/springboot2/SpringBoot2/
版权声明: 转载请注明出处。